
.gif "easy origami frog step by step")
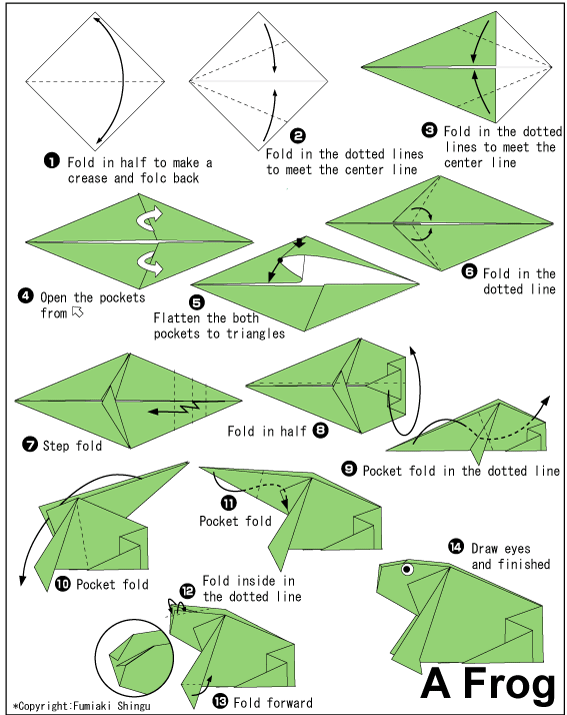
Tenth, fold the bottom corners outward to form the "back legs" of the frog.Ninth, fold the corners down so they meet at the bottom of the figure.Eighth, insert your fingers into the inside of the flaps, and pull the bottom corners outward to the sides, so that the bottom edge comes up to touch the bottom of the legs.Fold the square into a triangle by connecting two opposite corners. Prepare a square piece of paper of any desired size. Materials: Green paper in the shape of a square Paper eyes Glue. Seventh, fold the bottom of the paper upward so its edge touches the bottom of the "legs," and unfold right away. We make a frog quickly, easily and with pleasure.Sixth, fold the sides inward to meet at the center.Fold the two corners of the triangle up to form the "front legs" of the frog. Fifth, fold the bottom of the paper up so that its edge meets the bottom of your triangle.You’ll use this crease as a guide in later steps. Step 3) Fold the paper in half vertically again and then unfold it. Step 2) Fold the paper in half vertically. Fold it in half horizontally and un then unfold. Fourth, flip over once again, and fold the two edges toward you so they meet each other. Step 1) Start with a square sheet of paper with the white side up.Third, flip the paper over and fold the top of the paper down at the spot where the diagonal creases meet and then unfold it.Second, fold the corners down and unfold them right away, repeating this for both top corners of your rectangle.First, fold the paper in half sideways to make a rectangle.
#Easy origami frog step by step how to
For those who need a refresher, here are a few simple steps on how you can teach your kids how to make a jumping origami frog at home:
 0 kommentar(er)
